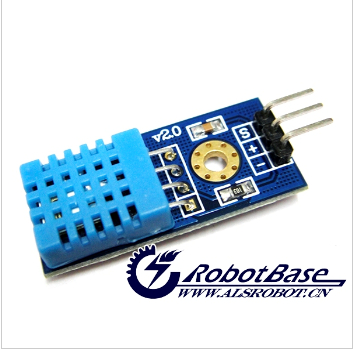
(SKU:RB-02S014)DHT11温湿度传感器
来自ALSROBOT WiKi
目录 |
概述
- DHT11数字温湿度传感器是一款含有已校准数字信号输出的温湿度复合传感器。它应用专用的数字模块采集技术和温湿度传感技术,确保产品具有极高的可靠性与卓越的长期稳定性。传感器包括一个电阻式感湿元件和一个NTC测温元件,并与一个高性能8位单片机相连接。因此该产品具有品质卓越、超快响应、抗干扰能力强、性价比极高等优点。每个DHT11传感器都在极为精确的湿度校验室中进行校准。校准系数以程序的形式储存在OTP内存中,传感器内部在检测信号的处理过程中要调用这些校准系数。单线制串行接口,使系统集成变得简易快捷。超小的体积、极低的功耗,信号传输距离可达20米以上,使其成为各类应用甚至最为苛刻的应用场合的最佳选则。DHT11数字温湿度传感器模块为3针PH2.0封装,连接方便。
规格参数
- 供电电压:3V-5.5V
- 供电电流:最大2.5mA
- 温度范围:0-50℃ 误差±2℃
- 湿度范围:当环境温度在 0 ℃时为30~90%RH;当环境温度在25℃时为20~90%RH ;当环境温度在50℃时为20~80%RH
- 响应时间: 1/e(63%) 6-30s
- 测量分辨率分别为 8bit(温度)、8bit(湿度)
- 采样周期间隔不得低于1秒钟
- 模块尺寸:15mm×34mm
使用方法及例子程序
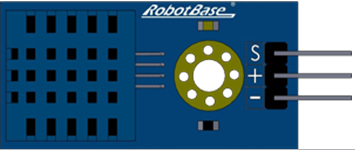
引脚定义
传感器引脚的定义是
- S:输出信号
- +:电源(VCC)
- -:地(GND)
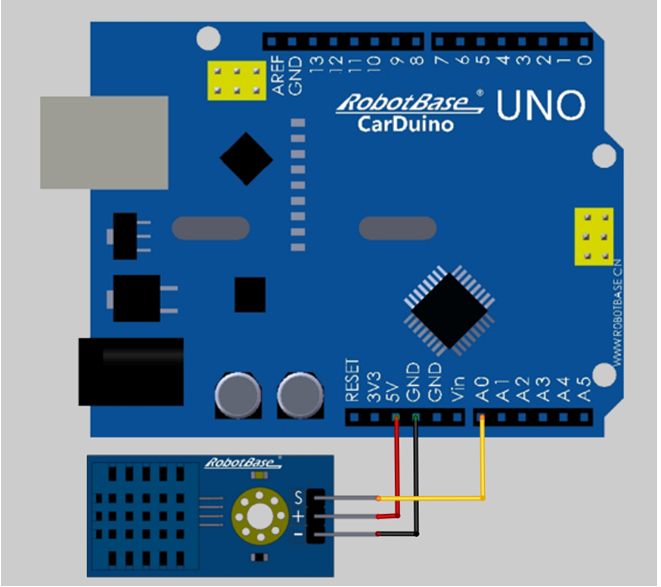
连接示意图
示例代码
- 使用传感器连接线将湿度传感器连接到Arduino传感器扩展板的模拟口0 上如示意图所示。然后将代码编译后下载到 Arduino里,就可以在串口助手窗口上显示测得的当前值(注:Arduino串口助手波特率调到19200 )。
- Arduino实验代码如下:
#define DHT11_PIN 0      // ADC0 UNO接到模拟口0   mega接PIN37
byte read_dht11_dat()
{
	byte i = 0;
	byte result=0;
	for(i=0; i< 8; i++){
	     while(!(PINC & _BV(DHT11_PIN)));  // wait for 50us
	     delayMicroseconds(30);
	     if(PINC & _BV(DHT11_PIN))
	     result |=(1<<(7-i));
             while((PINC & _BV(DHT11_PIN)));  // wait '1' finish
	}
	return result;
}
void setup()
{
	DDRC |= _BV(DHT11_PIN);
	PORTC |= _BV(DHT11_PIN);
	  Serial.begin(19200);
Serial.println("Ready");
	}

void loop()
{
	byte dht11_dat[5];
	byte dht11_in;
	byte i;
	// start condition
	// 1. pull-down i/o pin from 18ms
	PORTC &= ~_BV(DHT11_PIN);
	delay(18);
	PORTC |= _BV(DHT11_PIN);
	delayMicroseconds(40);
	DDRC &= ~_BV(DHT11_PIN);
	delayMicroseconds(40);
	dht11_in = PINC & _BV(DHT11_PIN);
	if(dht11_in){
		Serial.println("dht11 start condition 1 not met");
		return;
	}
	delayMicroseconds(80);
	dht11_in = PINC & _BV(DHT11_PIN);
	if(!dht11_in){
		Serial.println("dht11 start condition 2 not met");
		return;
	}
	delayMicroseconds(80);
	// now ready for data reception
	for (i=0; i<5; i++)
		dht11_dat[i] = read_dht11_dat();
	DDRC |= _BV(DHT11_PIN);
	PORTC |= _BV(DHT11_PIN);
  byte dht11_check_sum = dht11_dat[0]+dht11_dat[1]+dht11_dat[2]+dht11_dat[3];
	// check check_sum
	if(dht11_dat[4]!= dht11_check_sum)
	{
		Serial.println("DHT11 checksum error");
	}
	Serial.print("Current humdity = ");
	Serial.print(dht11_dat[0], DEC);
	Serial.print(".");
	Serial.print(dht11_dat[1], DEC);
	Serial.print("%  ");
	Serial.print("temperature = ");
	Serial.print(dht11_dat[2], DEC);
	Serial.print(".");
	Serial.print(dht11_dat[3], DEC);
	Serial.println("C  ");
	delay(2000);
}
程序效果
编译代码后下载到Arduino中,打开串口助手即可看见实际测量的温度与湿度。
应用例程
我们使用Arduino控制器来做个测试,要用到硬件设备如下:
- Arduino控制器×1
- Arduino 传感器扩展板×1
- DHT11温湿度传感器模块×1
- 蜂鸣器发声模块×1和 LED发光模块×1
- 通用3P传感器连接线×3
- USB数据通信线×1
如图所示,使用传感器连接线将湿度传感器连接到Arduino传感器扩展板的模拟口0上。如需检测到达某一温度和湿度时报警可以把本公司的蜂鸣器模块和LED发光模块连接到数字口上。先把DHT11库文件解压缩到你的Arduino安装目录下的hardware\libraries里面(如需DHT11库文件请联系我们的技术客服)。然后将代码编译后下载到Arduino里,就可以在串口助手窗口上显示测得的当前值(注:Arduino串口助手波特率调到19200)。
- Arduino实验代码如下:
#define DHT11_PIN 0
int  Led=8;//定义数字口8为LED灯
int  Buzzer=7;//定义数字口7为蜂鸣器
byte read_dht11_dat()
{
	byte i = 0;
	byte result=0;
	for(i=0; i< 8; i++)
{
		while(!(PINC & _BV(DHT11_PIN)));  // wait for 50us
		delayMicroseconds(30);
		if(PINC & _BV(DHT11_PIN))
			result |=(1<<(7-i));
          while((PINC & _BV(DHT11_PIN)));  // wait '1' finish
	 }
	return result;
}

void setup()
{
	DDRC |= _BV(DHT11_PIN);
	PORTC |= _BV(DHT11_PIN);
  pinMode(Led,OUTPUT);//定义数字口Led为输出模式
  pinMode(Buzzer,OUTPUT); //定义数字口Buzzer为输出模式
	Serial.begin(19200);
Serial.println("Ready");
}

void loop()
{
	byte dht11_dat[5];
	byte dht11_in;
	byte i;
	// start condition
	// 1. pull-down i/o pin from 18ms
	PORTC &= ~_BV(DHT11_PIN);
	delay(18);
	PORTC |= _BV(DHT11_PIN);
	delayMicroseconds(40);
	DDRC &= ~_BV(DHT11_PIN);
	delayMicroseconds(40);
	dht11_in = PINC & _BV(DHT11_PIN);
	if(dht11_in){
		Serial.println("dht11 start condition 1 not met");
		return;
	}
	delayMicroseconds(80);
	dht11_in = PINC & _BV(DHT11_PIN);
	if(!dht11_in)
{
			Serial.println("dht11 start condition 2 not met");
			return;
	      }
	delayMicroseconds(80);
	// now ready for data reception
	for (i=0; i<5; i++)
	dht11_dat[i] = read_dht11_dat();
	DDRC |= _BV(DHT11_PIN);
	PORTC |= _BV(DHT11_PIN);
   byte dht11_check_sum = dht11_dat[0]+dht11_dat[1]+dht11_dat[2]+dht11_dat[3];
	// check check_sum
	if(dht11_dat[4]!= dht11_check_sum)
	{
		Serial.println("DHT11 checksum error");
	}
	Serial.print("Current humdity = ");
	Serial.print(dht11_dat[0], DEC);
	Serial.print(".");
	Serial.print(dht11_dat[1], DEC);
	Serial.print("%  ");
	Serial.print("temperature = ");
	Serial.print(dht11_dat[2], DEC);
	Serial.print(".");
	Serial.print(dht11_dat[3], DEC);
	Serial.println("C  ");
  if(dht11_dat[0]==25) 判断湿度是否为25%
digitalWrite(Led,HIGH);//当湿度等于25%时LED灯亮
else
digitalWrite(Led,LOW); //当湿度不等于25%时LED灯灭

if(dht11_dat[0]==28) 判断温度是否为28度
digitalWrite(Buzzer,LOW); //当温度等于28度时蜂鸣器响
else
digitalWrite(Buzzer,HIGH); //当温度不等于28度时蜂鸣器不响
	delay(2000);
}
此代码功能是检测当前环境下的湿度和温度值。设定当湿度等于25%时LED灯亮,当温度等于28度时蜂鸣器响。如下图所示,串口助手窗口左侧一列显示为当前湿度值右侧一列为当前温度值。
产品相关推荐
购买地址:DHT11温湿度传感器
技术社区:哈尔滨奥松机器人科技有限公司技术论坛


